VSCode로 BE 개발 및 디버깅 환경 설정하기
이 문서는 Ubuntu 20.04에서 VSCode를 사용해 Apache Doris BE를 컴파일하고 실행하며 디버깅하는 방법을 설명합니다. GDB, LLDB, core dump를 이용한 세 가지 디버깅 방법을 다룹니다.
BE 바이너리의 이름은
doris_be입니다. 이전 버전에서는palo_be라는 이름을 사용했습니다.
1. 사전 준비
-
Doris 소스 코드를 다운로드합니다: GitHub의 apache/doris
-
기본 도구 모음을 설치합니다: GCC 8.3.1+, Oracle JDK 1.8+, Python 2.7+.
gcc,java,python이 올바른 버전을 가리키는지 확인하고JAVA_HOME환경 변수를 설정합니다. -
기타 의존성을 설치합니다:
sudo apt install build-essential openjdk-8-jdk maven cmake byacc flex automake libtool-bin bison binutils-dev libiberty-dev zip unzip libncurses5-dev curl git ninja-build python brotli
sudo add-apt-repository ppa:ubuntu-toolchain-r/ppa
sudo apt update
sudo apt install gcc-10 g++-10
sudo apt-get install autoconf automake libtool autopoint -
OpenSSL을 설치합니다:
sudo apt install -y openssl libssl-dev
2. 컴파일
다음 단계는 /home/workspace 디렉터리에서 수행합니다.
2.1 소스 코드 다운로드
git clone https://github.com/apache/doris.git
cd doris
git submodule update --init --recursive
2.2 서드파티 의존성 컴파일
cd /home/workspace/doris/thirdparty
./build-thirdparty.sh
2.3 Doris 컴파일
cd /home/workspace/doris
./build.sh
build.sh는 다음 조합을 지원합니다:
| 명령 | 설명 |
|---|---|
./build.sh | BE와 FE 모두 컴파일 |
./build.sh --be | BE만 컴파일 |
./build.sh --fe | FE만 컴파일 |
./build.sh --fe --be | BE와 FE 모두 컴파일 |
./build.sh --fe --be --clean | 정리한 후 BE와 FE 모두 컴파일 |
./build.sh --fe --clean | 정리한 후 FE 컴파일 |
./build.sh --be --clean | 정리한 후 BE 컴파일 |
빌드 결과물은 /home/workspace/doris/output/ 디렉터리에 생성됩니다. 문제가 발생하면 Doris 공식 문서를 참조하세요.
FE를 컴파일할 때 비공개 Maven 저장소를 지정해야 한다면 USER_SETTINGS_MVN_REPO 환경 변수가 settings.xml 경로를 가리키도록 설정합니다:
export USER_SETTINGS_MVN_REPO="/xxx/xxx/settings.xml"
3. 배포 및 디버깅 (GDB)
3.1 BE 바이너리에 실행 권한 부여
chmod +x /home/workspace/doris/output/be/lib/doris_be
/home/workspace/doris/output/be/lib/doris_be는 BE 실행 파일입니다.
3.2 데이터 저장 디렉터리 생성
/home/workspace/doris/output/be/conf/be.conf 파일을 확인합니다:
# INFO, WARNING, ERROR, FATAL
sys_log_level = INFO
be_port = 9060
be_rpc_port = 9070
webserver_port = 8040
heartbeat_service_port = 9050
brpc_port = 8060
arrow_flight_sql_port = -1

# Note that there should at most one ip match this list.
# If no ip match this rule, will choose one randomly.
# use CIDR format, e.g. 10.10.10.0/
# Default value is empty.
priority_networks = 192.168.59.0/24 # data root path, separate by ';'
storage_root_path = /soft/be/storage
storage_root_path를 기준으로 데이터 디렉터리를 생성합니다:
mkdir -p /soft/be/storage
3.3 소스 코드 열기 및 디버깅 확장 설치
-
VSCode에서 BE 소스 코드 디렉터리(이 예제에서는
/home/workspace/doris/)를 엽니다. -
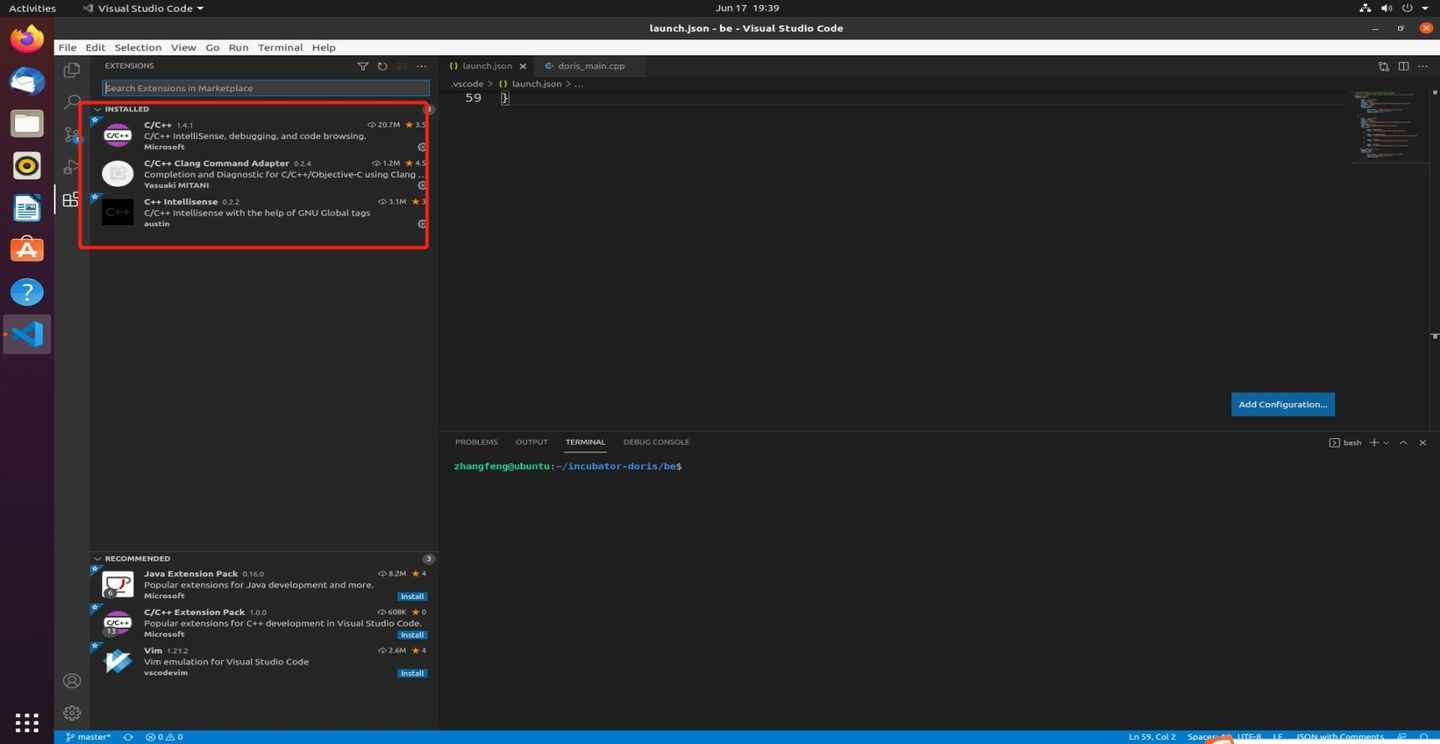
VSCode C/C++ (ms-vscode.cpptools) 디버깅 확장을 설치합니다.
3.4 launch.json 생성
.vscode/launch.json에 Launch 모드 설정을 만듭니다:
{
    "version": "0.2.0",
    "configurations": [
        {
            "name": "(gdb) Launch",
            "type": "cppdbg",
            "request": "launch",
            "program": "/home/workspace/doris/output/be/lib/doris_be",
            "args": [],
            "stopAtEntry": false,
            "cwd": "/home/workspace/doris/",
            "environment": [
                {"name": "DORIS_HOME", "value": "/home/workspace/doris/output/be/"},
                {"name": "UDF_RUNTIME_DIR", "value": "/home/workspace/doris/output/be/lib/udf-runtime"},
                {"name": "LOG_DIR", "value": "/home/workspace/doris/output/be/log"},
                {"name": "PID_DIR", "value": "/home/workspace/doris/output/be/bin"}
            ],
            "externalConsole": true,
            "MIMode": "gdb",
            "miDebuggerPath": "/path/to/gdb",
            "setupCommands": [
                {
                    "description": "Enable pretty-printing for gdb",
                    "text": "-enable-pretty-printing",
                    "ignoreFailures": true
                }
            ]
        }
    ]
}
environment는 doris_be 실행에 필요한 환경 변수를 정의합니다. 이 변수를 설정하지 않으면 시작에 실패합니다:
| 환경 변수 | 용도 |
|---|---|
DORIS_HOME | BE 런타임 루트 디렉터리 |
UDF_RUNTIME_DIR | UDF 런타임 디렉터리 |
LOG_DIR | 로그 디렉터리 |
PID_DIR | PID 파일 디렉터리 |
miDebuggerPath는 디버거 경로(예: gdb)를 지정합니다. 지정하지 않으면 시스템 PATH에서 검색합니다. 시스템에 포함된 GDB 버전이 너무 오래되었을 수 있으므로 새 버전의 경로를 직접 지정해야 할 수 있습니다.
3.5 Attach 모드 디버깅
실행 중인 BE 프로세스에 연결하려면 다음 설정을 사용합니다:
{
    "version": "0.2.0",
    "configurations": [
        {
            "name": "(gdb) Launch",
            "type": "cppdbg",
            "request": "attach",
            "program": "/home/workspace/doris/output/lib/doris_be",
            "processId": "${command:pickProcess}",
            "MIMode": "gdb",
            "miDebuggerPath": "/path/to/gdb",
            "internalConsoleOptions": "openOnSessionStart",
            "setupCommands": [
                {
                    "description": "Enable pretty-printing for gdb",
                    "text": "-enable-pretty-printing",
                    "ignoreFailures": true
                }
            ]
        }
    ]
}
주요 사항:
-
"request": "attach": 디버깅 모드를 Attach로 설정합니다. -
"processId": 연결할 프로세스의 PID입니다. 특정 숫자를 지정하거나,"${command:pickProcess}"를 사용해 시작 시 직접 선택하거나, 다음 명령으로 추출할 수 있습니다:lsof -i | grep -m 1 doris_be | awk "{print $2}"
위 이미지에서
15200은 현재 BE 프로세스의 ID입니다.
3.6 전체 launch.json 예제
다음은 Launch 모드와 Attach 모드를 모두 포함하는 전체 설정입니다:
{
    "version": "0.2.0",
    "configurations": [
        {
            "name": "(gdb) Attach",
            "type": "cppdbg",
            "request": "attach",
            "program": "/home/workspace/doris/output/be/lib/doris_be",
            "processId": 17016,
            "MIMode": "gdb",
            "miDebuggerPath": "/path/to/gdb",
            "setupCommands": [
                {
                    "description": "Enable pretty-printing for gdb",
                    "text": "-enable-pretty-printing",
                    "ignoreFailures": true
                }
            ]
        },
        {
            "name": "(gdb) Launch",
            "type": "cppdbg",
            "request": "launch",
            "program": "/home/workspace/doris/output/be/lib/doris_be",
            "args": [],
            "stopAtEntry": false,
            "cwd": "/home/workspace/doris/output/be",
            "environment": [
                {"name": "DORIS_HOME", "value": "/home/workspace/doris/output/be"},
                {"name": "UDF_RUNTIME_DIR", "value": "/home/workspace/doris/output/be/lib/udf-runtime"},
                {"name": "LOG_DIR", "value": "/home/workspace/doris/output/be/log"},
                {"name": "PID_DIR", "value": "/home/workspace/doris/output/be/bin"}
            ],
            "externalConsole": false,
            "MIMode": "gdb",
            "miDebuggerPath": "/path/to/gdb",
            "setupCommands": [
                {
                    "description": "Enable pretty-printing for gdb",
                    "text": "-enable-pretty-printing",
                    "ignoreFailures": true
                }
            ]
        }
    ]
}
3.7 디버깅 시작
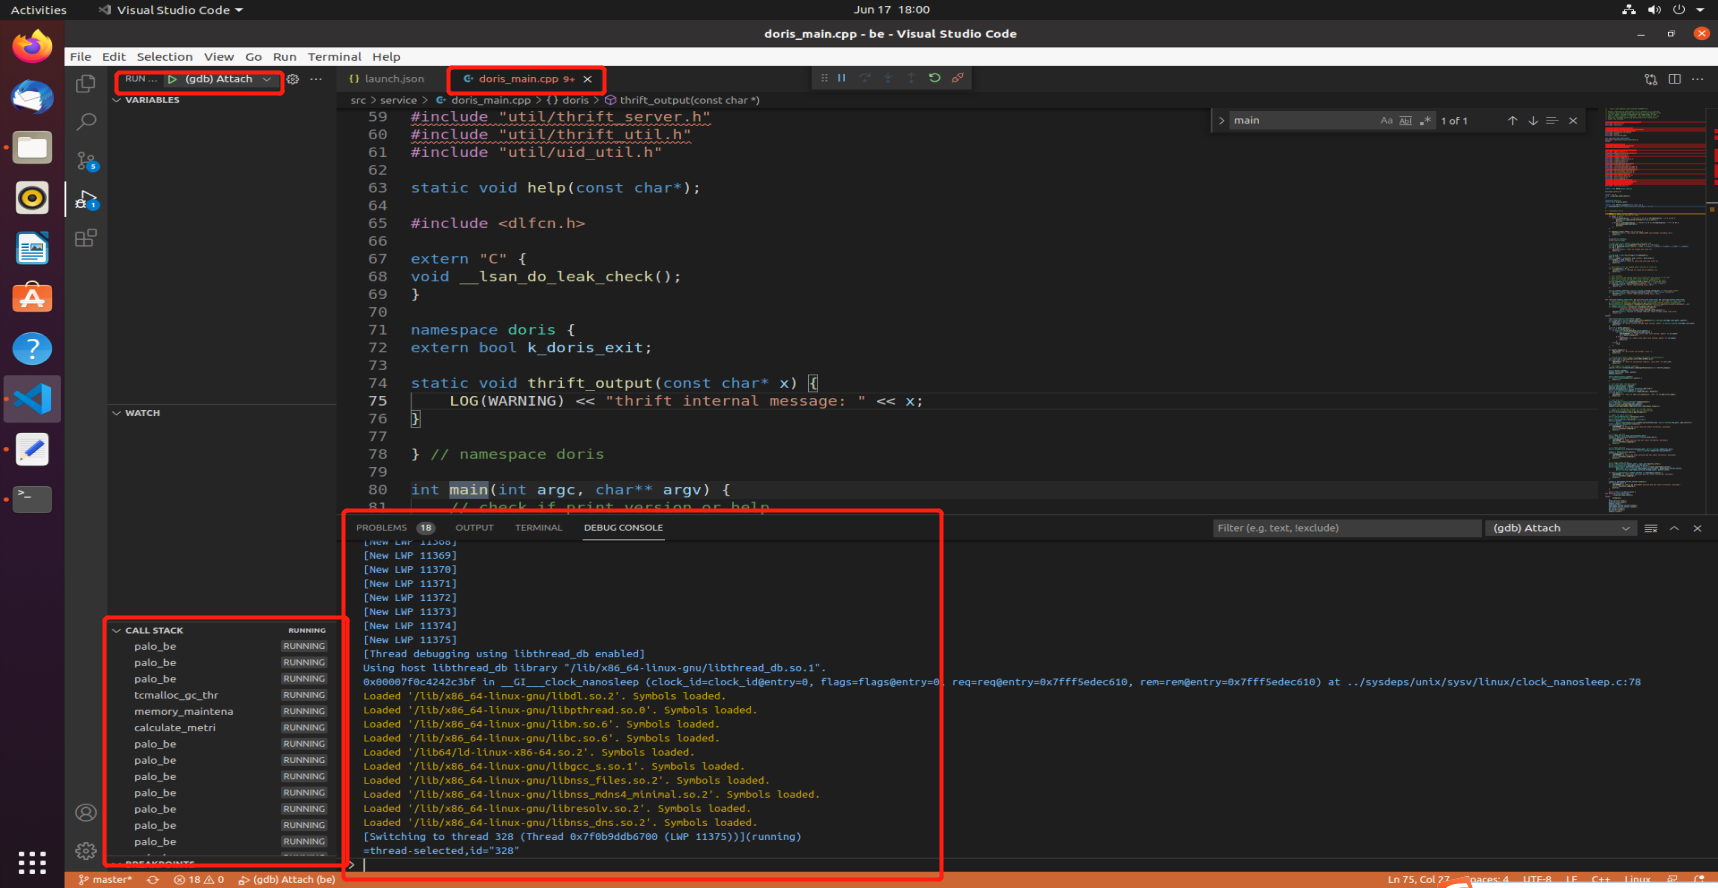
VSCode의 디버그 버튼을 클릭해 Doris BE 디버깅을 시작합니다.
4. 디버깅 (LLDB)
LLDB는 GDB보다 빠르게 프로세스에 연결되며 사용 방법도 비슷합니다. VSCode 확장 CodeLLDB를 설치한 후 launch.json에 다음 설정을 추가합니다:
{
    "name": "CodeLLDB attach",
    "type": "lldb",
    "request": "attach",
    "program": "${workspaceFolder}/output/be/lib/doris_be",
    "pid": "${command:pickMyProcess}"
}
이 방법을 사용하려면 시스템 glibc 버전이 2.18+여야 합니다. 이 조건을 충족하지 못하면 CentOS7에서 CodeLLDB를 사용하는 방법을 참조해 더 새로운 버전의 glibc를 설치하고 확장에 연결합니다.
5. Core Dump 파일 디버깅
BE 충돌로 생성된 core 파일을 디버깅하려면 해당 설정 항목에 다음 내용을 추가합니다:
"coreDumpPath": "/PATH/TO/CORE/DUMP/FILE"
6. 일반적인 디버깅 팁
6.1 함수 실행 경로
BE의 세부 실행 방식이 익숙하지 않다면 perf 같은 도구로 함수 호출을 추적하고 호출 체인을 파악할 수 있습니다. perf 사용법은 디버깅 도구를 참조하세요.
추적하려는 SQL을 대용량 테이블에서 실행한 다음 샘플링 빈도를 높입니다(예: perf -F 999). 결과를 살펴보면 BE에서 해당 SQL의 주요 실행 경로를 대략 파악할 수 있습니다.
6.2 CRTP 객체 디버깅
런타임 효율을 높이기 위해 BE 코드는 기본 타입에 CRTP (Curiously Recurring Template Pattern)를 광범위하게 사용합니다. 이 때문에 디버거에서 객체를 파생 타입으로 살펴볼 수 없습니다. GDB에서는 다음과 같이 이 문제를 해결할 수 있습니다:
객체 col의 타입이 IColumn이지만 실제 타입을 모르는 상태에서 디버깅해야 한다고 가정해 보겠습니다:
set print object on   # Print objects by derived type
p *col.t              # Use col.t to get the concrete type of col
p col.t->size()       # Use it as the derived type, for example, ColumnString supports size()
다형성 효과는 포인터 COW::t에 적용되며 IColumn 클래스 객체에는 적용되지 않습니다. GDB에서 실제로 파생 타입 객체를 얻으려면 모든 col을 col.t로 바꿔 사용해야 합니다.
7. 자주 묻는 질문 (FAQ)
Q1: BE가 시작 직후 종료됨
환경 변수가 설정되지 않았거나 경로가 존재하지 않기 때문입니다. DORIS_HOME, LOG_DIR, PID_DIR, UDF_RUNTIME_DIR가 모두 설정되어 있고 해당 디렉터리가 생성되어 있는지 확인합니다.
Q2: GDB에서 버전이 너무 낮거나 기능이 지원되지 않는다는 오류 발생
시스템에 포함된 GDB 버전이 오래되었기 때문입니다. 새 버전의 GDB를 직접 설치하고 miDebuggerPath에 지정합니다.
Q3: CodeLLDB 로드 실패
시스템 glibc 버전이 2.18보다 낮기 때문입니다. 4절의 링크를 참조해 해결합니다.
Q4: FE 컴파일 시 Maven이 외부 네트워크에 연결하지 못함
USER_SETTINGS_MVN_REPO 환경 변수가 비공개 Maven 저장소의 settings.xml을 가리키도록 설정합니다. 2.3절의 팁을 참조하세요.