使用 IntelliJ IDEA 搭建 FE 开发环境
1.环境准备
JDK1.8+, IntelliJ IDEA
-
从 https://github.com/apache/doris.git 下载源码到本地
-
使用IntelliJ IDEA 打开代码根目录
-
如果仅进行fe开发而没有编译过thirdparty,则需要安装thrift,并将thrift 复制或者连接到
thirdparty/installed/bin目录下安装
thrift 0.16.0版本 (注意:Doris0.15 - 1.2 版本基于thrift 0.13.0构建, 最新代码使用thrift 0.16.0构建)以下示例以 0.16.0 为例。如需 0.13.0,请将下面示例中的 0.16.0 改为 0.13.0 即可。
-
Windows:
- 下载:
http://archive.apache.org/dist/thrift/0.16.0/thrift-0.16.0.exe - 拷贝:将文件拷贝至
./thirdparty/installed/bin
- 下载:
-
MacOS:
brew tap homebrew/core --forcebrew tap-new $USER/local-tapbrew extract --version='0.16.0' thrift $USER/local-tapbrew install thrift@0.16.0
如有下载相关的报错,可修改如下文件:
/usr/local/Homebrew/Library/Taps/$USER/homebrew-local-tap/Formula/thrift\@0.16.0.rb将其中的:
url "https://www.apache.org/dyn/closer.lua?path=thrift/0.16.0/thrift-0.16.0.tar.gz"修改为:
url "https://archive.apache.org/dist/thrift/0.16.0/thrift-0.16.0.tar.gz"参考链接:
https://gist.github.com/tonydeng/02e571f273d6cce4230dc8d5f394493c -
Linux:
- 下载源码包:
wget https://archive.apache.org/dist/thrift/0.16.0/thrift-0.16.0.tar.gz - 安装依赖:
yum install -y autoconf automake libtool cmake ncurses-devel openssl-devel lzo-devel zlib-devel gcc gcc-c++ tar zxvf thrift-0.16.0.tar.gzcd thrift-0.16.0./configure --without-testsmakemake install
安装完成后查看版本:thrift --version
注:如果编译过Doris,则不需要安装thrift,可以直接使用 $DORIS_HOME/thirdparty/installed/bin/thrift
- 下载源码包:
-
-
如果是Mac 或者 Linux 环境 可以通过 如下命令自动生成代码:
sh generated-source.sh如使用 1.2 及之前版本,可以使用如下命令:
cd fe
mvn generate-sources
如果出现错误,则执行:
cd fe && mvn clean install -DskipTests
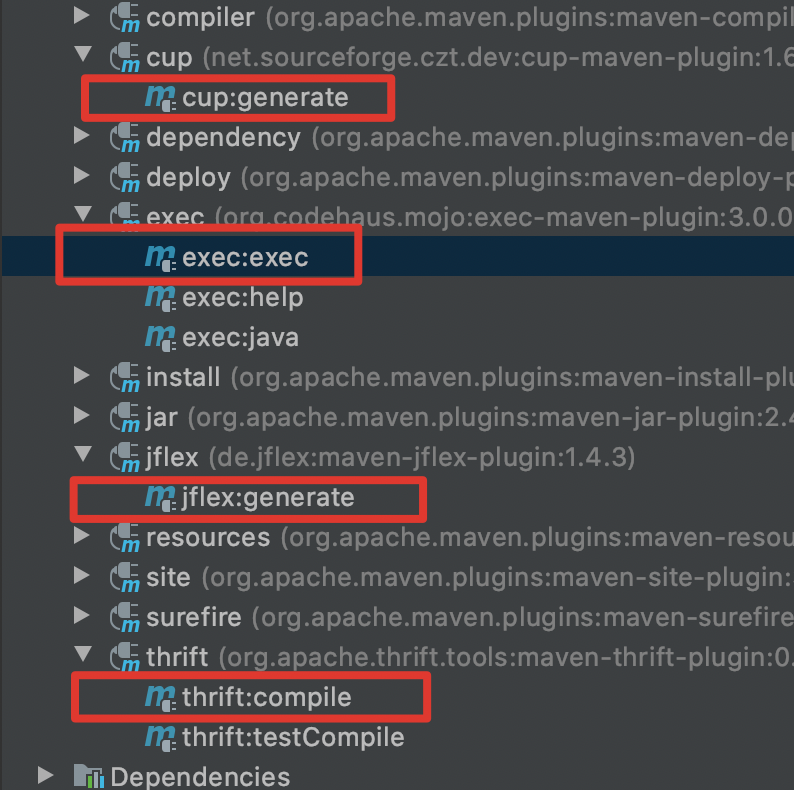
或者通过图形界面运行 maven 命令生成

如果使用windows环境可能会有make命令和sh脚本无法执行的情况 可以通过拷贝linux上的 fe/fe-core/target/generated-sources 目录拷贝到相应的目录的方式实现,也可以通过docker 镜像挂载本地目录之后,在docker 内部生成自动生成代码,可以参照编译一节
-
如果还未生成过help文档,需要跳转到docs目录,执行
sh build_help_zip.sh,然后将build中的help-resource.zip拷贝到fe/fe-core/target/classes中
2.调试
-
用idea导入fe工程
-
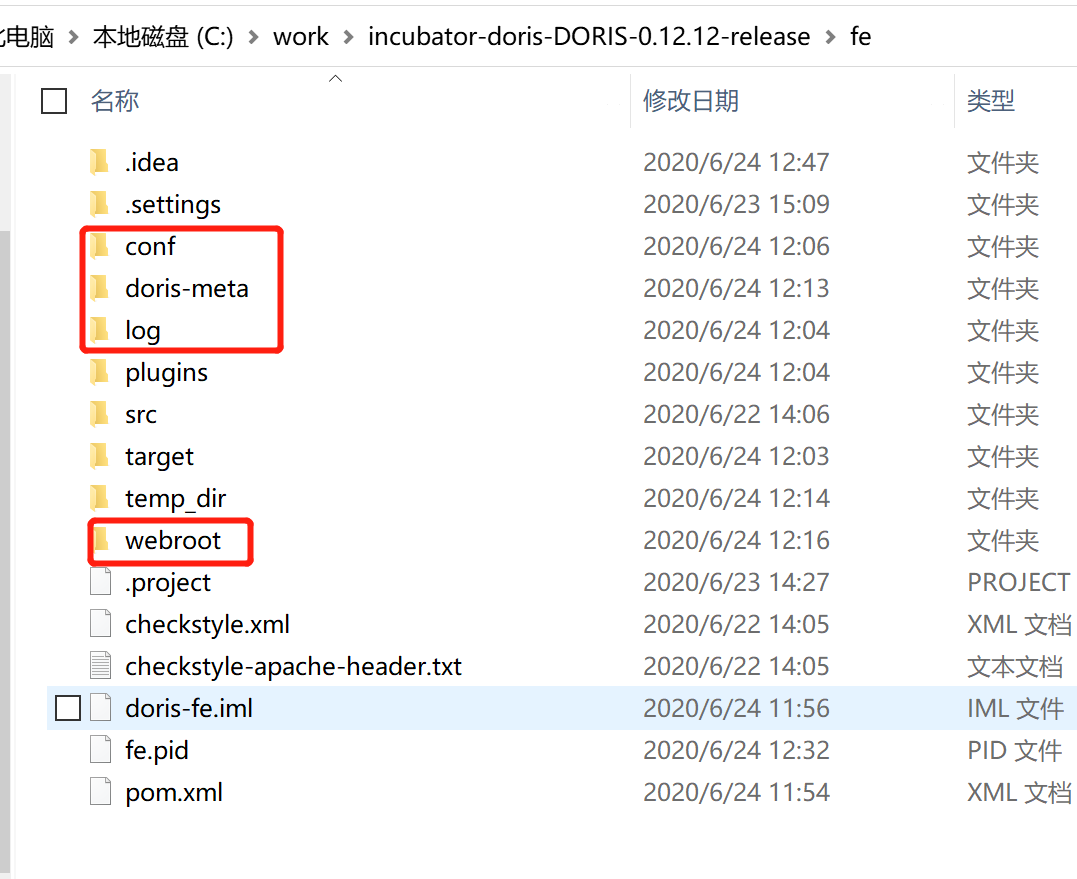
在fe目录下创建下面红框标出的目录(在新版本中该目录可能存在,如存在则跳过,否则创建)

- 编译
ui项目,将ui/dist/目录中的文件拷贝到webroot中(如果你不需要看DorisUI,这一步可以跳过)
3.配置conf/fe.conf
下面是我自己的配置,你可以根据自己的需要进行修改(注意:如果使用Mac开发,由于docker for Mac不支持Host模式,需要使用-p方式暴露be端口,同时fe.conf的priority_networks配置为容器内可访问的Ip,例如WIFI的Ip)
# Licensed to the Apache Software Foundation (ASF) under one
# or more contributor license agreements.  See the NOTICE file
# distributed with this work for additional information
# regarding copyright ownership.  The ASF licenses this file
# to you under the Apache License, Version 2.0 (the
# "License"); you may not use this file except in compliance
# with the License.  You may obtain a copy of the License at
#
#   http://www.apache.org/licenses/LICENSE-2.0
#
# Unless required by applicable law or agreed to in writing,
# software distributed under the License is distributed on an
# "AS IS" BASIS, WITHOUT WARRANTIES OR CONDITIONS OF ANY
# KIND, either express or implied.  See the License for the
# specific language governing permissions and limitations
# under the License.

#####################################################################
## The uppercase properties are read and exported by bin/start_fe.sh.
## To see all Frontend configurations,
## see fe/src/org/apache/doris/common/Config.java
#####################################################################

# the output dir of stderr and stdout
LOG_DIR = ${DORIS_HOME}/log

DATE = `date +%Y%m%d-%H%M%S`
JAVA_OPTS="-Xmx2048m -XX:+UseMembar -XX:SurvivorRatio=8 -XX:MaxTenuringThreshold=7 -XX:+PrintGCDateStamps -XX:+PrintGCDetails -XX:+UseConcMarkSweepGC -XX:+UseParNewGC -XX:+CMSClassUnloadingEnabled -XX:-CMSParallelRemarkEnabled -XX:CMSInitiatingOccupancyFraction=80 -XX:SoftRefLRUPolicyMSPerMB=0 -Xloggc:$DORIS_HOME/log/fe.gc.log.$DATE"

# For jdk 9+, this JAVA_OPTS will be used as default JVM options
JAVA_OPTS_FOR_JDK_9="-Xmx4096m -XX:SurvivorRatio=8 -XX:MaxTenuringThreshold=7 -XX:+CMSClassUnloadingEnabled -XX:-CMSParallelRemarkEnabled -XX:CMSInitiatingOccupancyFraction=80 -XX:SoftRefLRUPolicyMSPerMB=0 -Xlog:gc*:$DORIS_HOME/log/fe.gc.log.$DATE:time"

##
## the lowercase properties are read by main program.
##

# INFO, WARN, ERROR, FATAL
sys_log_level = INFO

# store metadata, create it if it is not exist.
# Default value is ${DORIS_HOME}/doris-meta
# meta_dir = ${DORIS_HOME}/doris-meta

http_port = 8030
rpc_port = 9020
query_port = 9030
arrow_flight_sql_port = -1
edit_log_port = 9010

# Choose one if there are more than one ip except loopback address.
# Note that there should at most one ip match this list.
# If no ip match this rule, will choose one randomly.
# use CIDR format, e.g. 10.10.10.0/24
# Default value is empty.
# priority_networks = 10.10.10.0/24;192.168.0.0/16

# Advanced configurations
# log_roll_size_mb = 1024
# sys_log_dir = ${DORIS_HOME}/log
# sys_log_roll_num = 10
# sys_log_verbose_modules =
# audit_log_dir = ${DORIS_HOME}/log
# audit_log_modules = slow_query, query
# audit_log_roll_num = 10
# meta_delay_toleration_second = 10
# qe_max_connection = 1024
# qe_query_timeout_second = 300
# qe_slow_log_ms = 5000
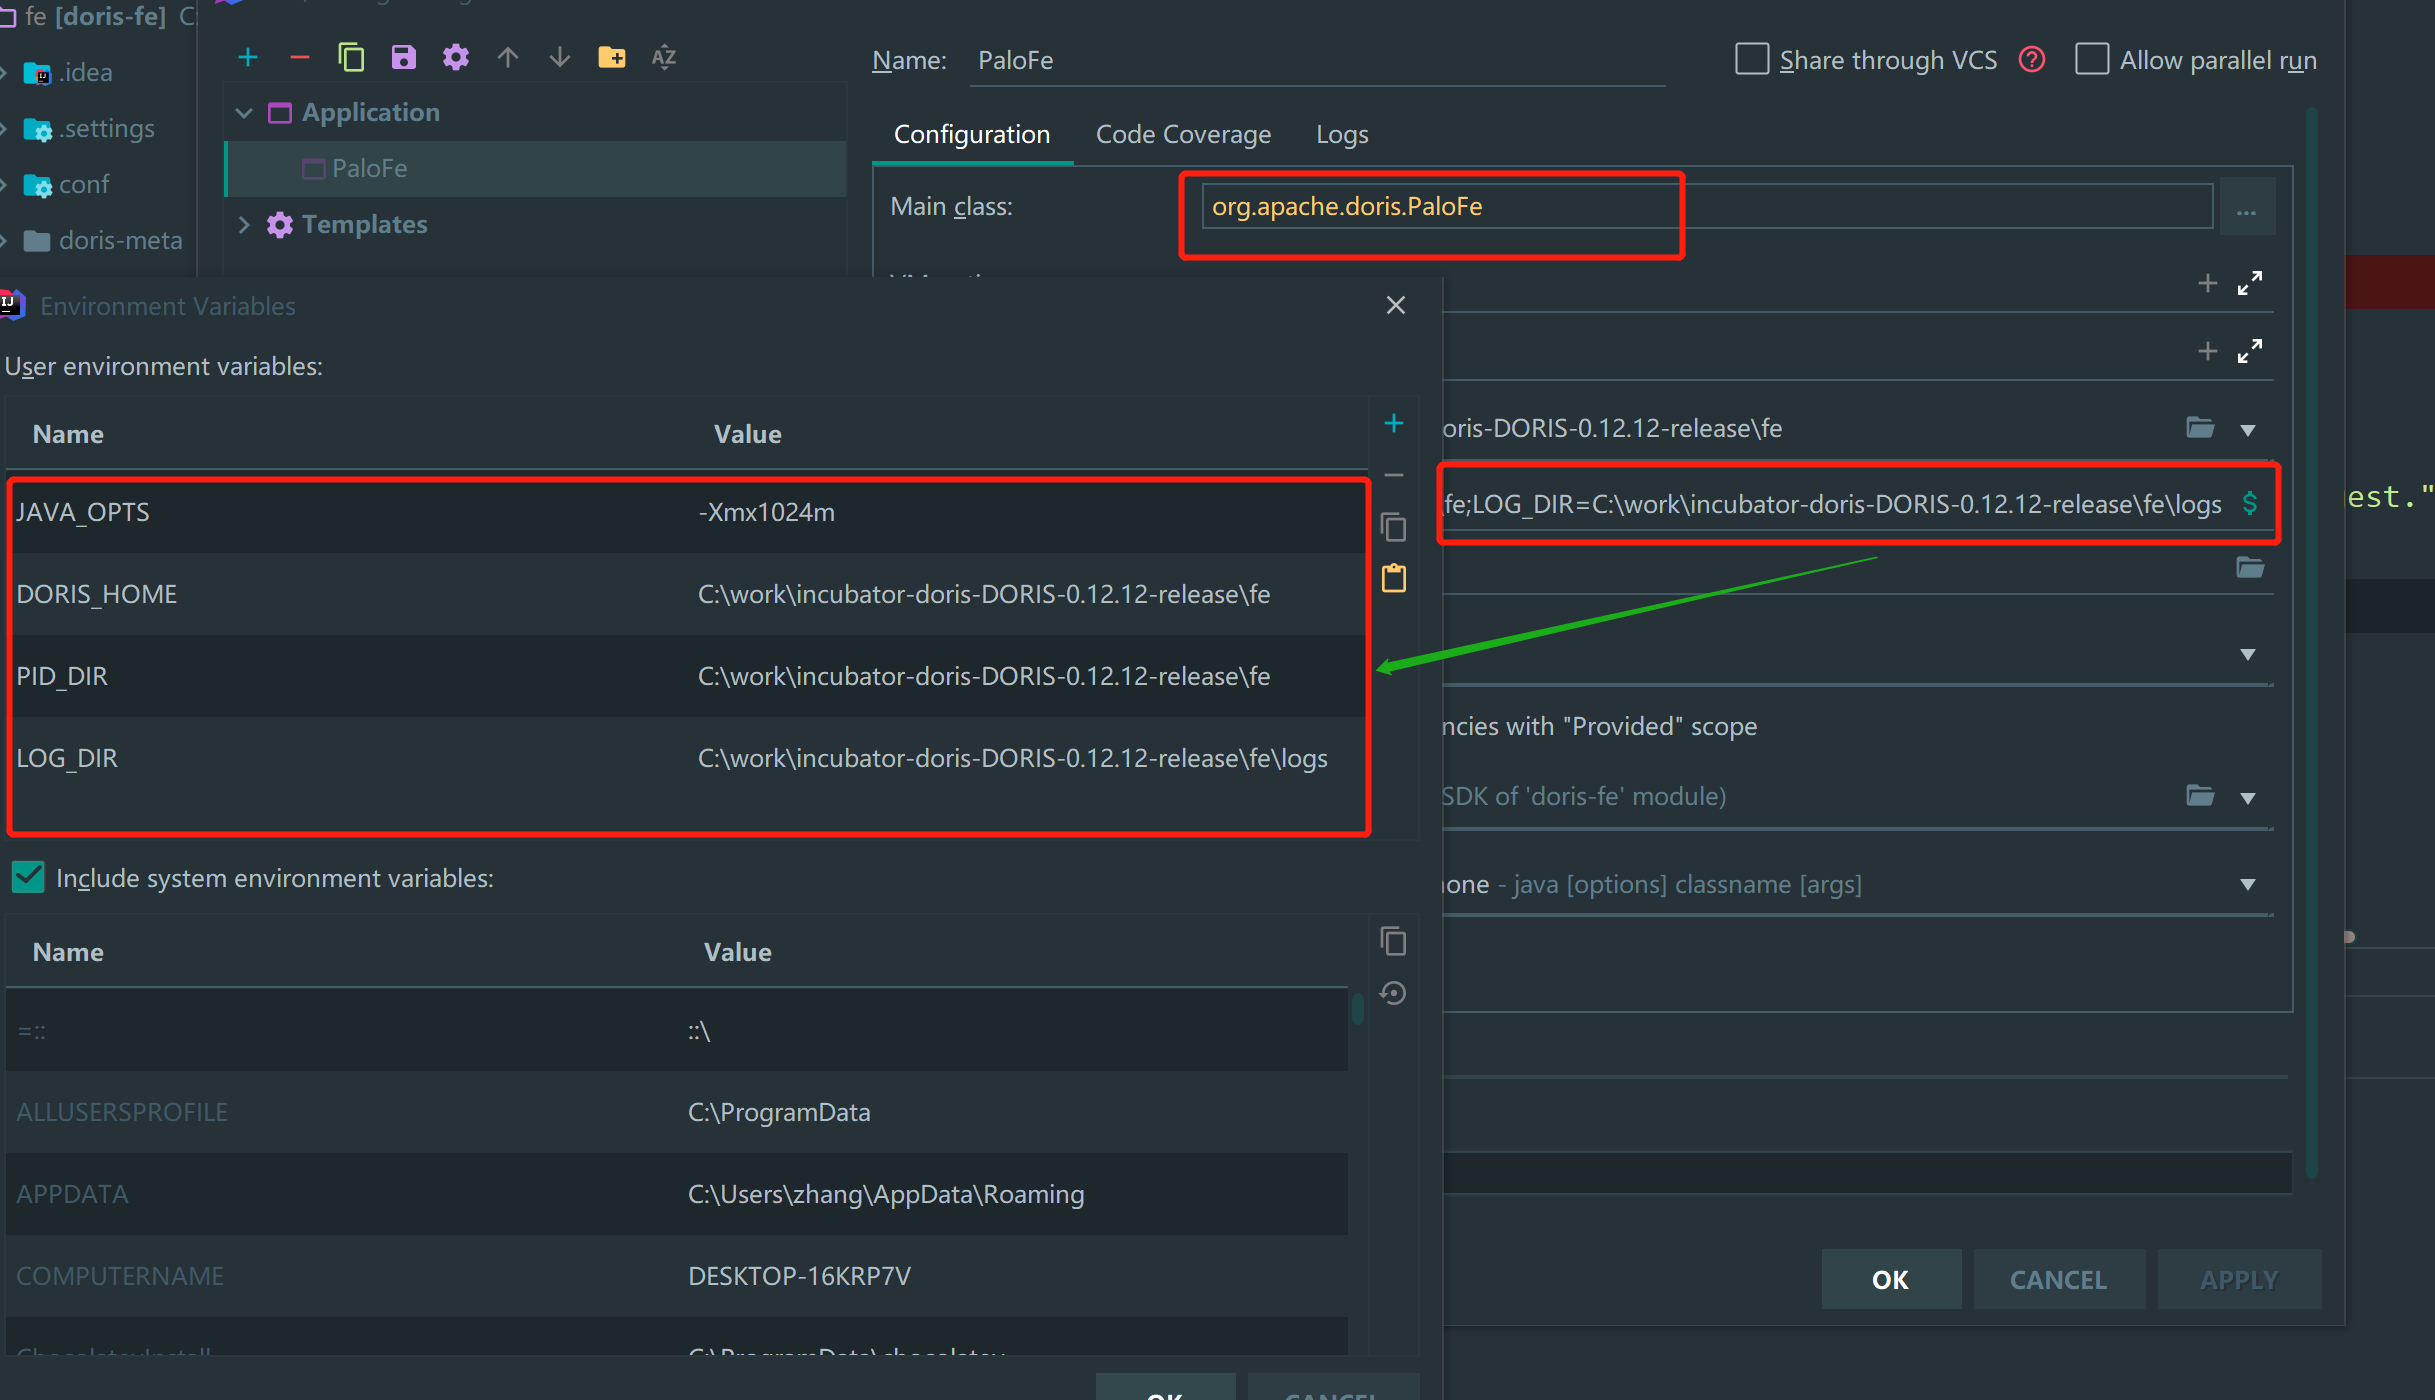
4.设置环境变量
在IDEA中设置运行环境变量

5.配置options
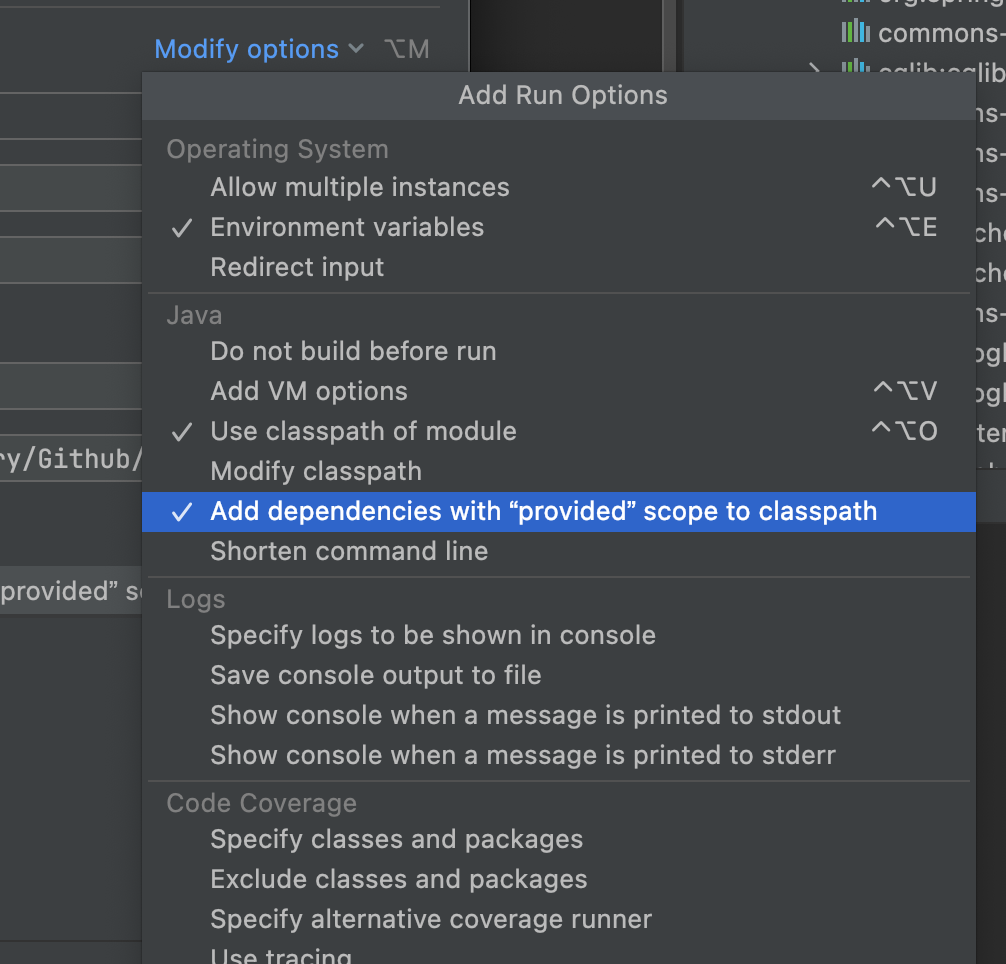
由于部分依赖使用了provided,idea需要做下特殊配置,在Run/Debug Configurations设置中点击右侧Modify options,勾选Add dependencies with "provided" scope to classpath选项

6.启动fe
下面你就可以愉快的启动,调试你的FE了
