Standard Deployment
Standard Deployment
Manually deploying a Doris cluster typically involves four steps:
- Check hardware and software environment: check the hardware resources available to the user and ensure compatibility with the operating system
- Check operating system: review the operating system parameters and configurations
- Plan the cluster: plan the FE and BE nodes of the cluster and estimate the required resources
- Deploy cluster: deploy the cluster based on the planning and configuration
- Verify: log in to the cluster and check if everything is right
1. Check hardware and software environment
Check hardware
CPU
When installing Doris, it is recommended to use machines that support the AVX2 instruction set to leverage its vectorization capabilities for query acceleration.
Run the following command. If a result is returned, that means the machine supports the AVX2 instruction set.
cat /proc/cpuinfo | grep avx2
If AVX2 instruction set is not supported, you can deploy Doris using the "noavx2" installation package.
Memory
Doris does not impose strict memory limits. In a production environment, it is generally recommended to have the number of GB of memory at least four times the number of CPU cores (e.g., a machine with 16 cores should have at least 64GB of memory). With more memory space comes better performance.
Storage
When deploying Doris, data can be stored on SSDs, HDDs, or object storage.
It is recommended to use SSD as the data storage in the following scenarios:
- High-concurrency point queries with large data volumes.
- High-frequency data update with large data volumes.
File system
Doris supports both ext4 and xfs file systems.
Network Card
During the computation process, Doris shards and distributes data to different instances for parallel processing, which incurs network overheads. To optimize Doris performance and minimize network overheads, it is strongly recommended to deploy Doris using 10 Gigabit Ethernet (10 GbE) or faster network cards.
Recommended servers
Doris can run on servers with x86-64 architecture or ARM64 architecture.
Development and testing environment
| Module | CPU | Memory | Disk | Network | Instance (minimum) |
|---|---|---|---|---|---|
| Frontend | 8+ Cores | 8+ GB | SSD or SATA, 10+ GB | 1 or 10 GbE | 1 |
| Backend | 8+ Cores | 16+ GB | SSD or SATA, 50+ GB | 1 or 10 GbE | 1 |
Description:
- In a validation testing environment, you can deploy the FE and BE on the same server.
- It is generally recommended to deploy only one BE instance on a single machine. Meanwhile, you can only deploy one FE on one machine.
- If you need three replicas of data, you will need at least three machines and deploy one BE instance on each of them, instead of deploying three BE instances on one single machine.
- The clocks of multiple servers hosting FEs must be synchronized, allowing a maximum clock deviation of 5 seconds.
- In a testing environment, you can also perform tests with just one BE. In the actual production environment, the number of BE instances directly affects the overall query latency.
Production environment
| Module | CPU | Memory | Disk | Network | Instance (minimum) |
|---|---|---|---|---|---|
| Frontend | 16+ Cores | 64+ GB | SSD or RAID, 100+ GB | 10 GbE | 1 |
| Backend | 16+ Cores | 64+ GB | SSD or SATA, 100+ GB | 10 GbE | 3 |
Description:
- In a production environment, if the FE and BE are co-located, be mindful of resource contention issues. It is recommended to store metadata and data on separate disks.
- BE nodes can be configured with multiple disks for storage. You can bind multiple HDDs or SSDs to a single BE instance.
- The performance of the cluster is dependent on the resources of the BE nodes. The more BE nodes there are, the better the performance of Doris. Typically, Doris can fully leverage its performance potential with 10 to 100 machines.
Hard disk space calculation
In a Doris cluster, FE is mainly responsible for metadata storage, including metadata edit log and image. The disk space of BE mainly stores data, which needs to be calculated according to business needs.
| Component | Disk space description |
|---|---|
| FE | Generally, the size of metadata ranges from several hundred MB to several GB. The recommended disk space is not to be less than 100GB. |
| BE | Doris uses LZ4 compression by default, with a compression ratio of 0.3~0.5.Disk space needs to be calculated based on the total data volume * 3 (3 data replicas)There is a need to reserve 40% disk space for background data compaction and temporary data storage. |
| Broker | If you want to deploy a Broker, you can usually deploy the Broker node on the same machine as the FE /BE nodes. |
2. Check operating system
Disable swap partition
When deploying Doris, it is recommended to disable the swap partition. The swap partition is used by the kernel to move some memory data to a configured swap space when it detects memory pressure. However, since the kernel's strategy may not fully understand the behavior of the application, it can significantly impact the performance of the database. Therefore, it is advisable to disable it.
You can temporarily disable it using the following command. It will be enabled again upon the next machine boot.
swapoff -a
To permanently disable it, use the Linux root account to comment out the swap partition in /etc/fstab, and then reboot.
# /etc/fstab
# <file system>        <dir>         <type>    <options>             <dump> <pass>
tmpfs                  /tmp          tmpfs     nodev,nosuid          0      0
/dev/sda1              /             ext4      defaults,noatime      0      1
# /dev/sda2            none          swap      defaults              0      0
/dev/sda3              /home         ext4      defaults,noatime      0      2
It is not recommended to disable swap by setting vm.swappiness = 0 because this parameter has different semantics in different Linux kernel versions. In many cases, this will not completely disable swap.
Check and disable system firewall
If you find different ports, try disabling the firewall to confirm whether it is the cause. If it is, open the corresponding ports for communication based on the configured ports for Doris components.
sudo systemctl stop firewalld.service
sudo systemctl disable firewalld.service
Configure NTP service
Doris metadata requires a time precision of less than 5000ms, so clock synchronization is required for all machines in the cluster. This prevents metadata inconsistency from causing service abnormalities.
Typically, you can ensure clock synchronization across nodes by NTP service configuration.
sudo systemctl start ntpd.service
sudo systemctl enable ntpd.service
Set the maximum number of open file handles
Doris relies on a large number of files to manage table data. Thus, the system's limit on the number of files opened by programs needs to be increased.
vi /etc/security/limits.conf
* soft nofile 1000000
* hard nofile 1000000
For the changes to take effect, the current user needs to log out of the current session and log back in.
Modify the number of virtual memory areas
Set the number of virtual memory areas to at least 2000000.
sysctl -w vm.max_map_count=2000000
Disable transparent huge pages
It is recommended to disable transparent huge pages when deploying Doris.
echo never > /sys/kernel/mm/transparent_hugepage/enabled
echo never > /sys/kernel/mm/transparent_hugepage/defrag
3. Plan the cluster
Plan the ports
Doris instances communicate directly over the network, requiring the following ports for normal operation. Administrators can adjust Doris ports according to their environment:
| Instance | Port | Default Port | Communication Direction | Description |
|---|---|---|---|---|
| BE | be_port | 9060 | FE --> BE | thrift server port on BE, receiving requests from FE |
| BE | webserver_port | 8040 | BE <--> BE | http server port on BE |
| BE | heartbeat_service_port | 9050 | FE --> BE | heartbeat service port (thrift) on BE, receiving heartbeats from FE |
| BE | brpc_port | 8060 | FE <--> BEBE <--> BE | brpc port on BE, used for communication between BEs |
| FE | http_port | 8030 | FE <--> FEClient <--> FE | http server port on FE |
| FE | rpc_port | 9020 | BE --> FEFE <--> FE | thrift server port on FE, configuration of each FE should be consistent |
| FE | query_port | 9030 | Client <--> FE | MySQL server port on FE |
| FE | edit_log_port | 9010 | FE <--> FE | port on FE for bdbje communication |
| Broker | broker_ipc_port | 8000 | FE --> Broker BE --> Broker | thrift server on Broker, receiving requests |
Plan the nodes
Plan the FE nodes
FE nodes are primarily responsible for handling user requests, query parsing and planning, metadata management, and node management.
For a production cluster, it is generally recommended to deploy at least 3 FE nodes for high availability. In Doris, there are two roles of FE nodes:
- Follower nodes participate in elections. If the Master node fails, an available Follower node will be selected as the new Master.
- Observer nodes only synchronize metadata from the Leader node and do not participate in elections. They can be scaled to provide scalable metadata read services.
Typically, it is advised to deploy 3 Follower nodes. In high-concurrency scenarios, you can scale the Observer nodes.。
Plan the BE nodes
BE nodes are responsible for data storage and computation. In a production environment, it is common to have 3 data replicas, so it is recommended to deploy at least 3 BE nodes.
BE nodes can be scaled, too. By increasing the number of BE nodes, you can improve query performance and concurrency.
4. Deploy cluster
Deploy FE Master node
Create metadata path
Generally, FE metadata is no larger than 10GB. It is recommended to store FE metadata on a different disk than the BE node data.
After extracting the installation package, there is usually a default doris-meta directory included. It is advisable to create a separate metadata directory and create a symbolic link from that directory to doris-meta. In a production environment, it is strongly recommended to specify a separate directory instead of placing it within the Doris installation directory, preferably on a dedicated disk (preferably SSD). For testing and development environments, you can simply use the default configurations.
## Select a disk that is separated from the BE data storage and create the FE metadata directory.
mkdir -p <doris_meta_created>

## Create a symbolic link to the FE metadata directory.
ln -s <doris_meta_original> <doris_meta_created>
Modify FE configuration file
The FE configuration file is in the "conf" directory under the FE deployment path. Before starting the FE node, you need to modify the conf/fe.conf file.
Here are some necessary modifications:
- Modify FE metadata directory: In the configuration file,
meta_dirspecifies the location where metadata is stored. By default,meta_diris under the FE installation path. If you have created a symbolic link to the FE metadata directory, you don't need to configuremeta_dir. - Bind Cluster IP: In an environment with multiple network interfaces, you need to explicitly configure the "priority_networks".
priority_networks = 10.1.3.0/24
This is a CIDR representation that specifies the IP used by the FE. In environments using FQDN, you can ignore this.
Adjust FE Memory
In "fe.conf", the default maximum Java heap memory is set to 8GB. It is recommended to increase it to 16GB or higher for production environments. You can adjust the maximum Java heap memory by specifying the
-Xmxin theJAVA_OPTSparameter.JAVA_OPTS="-Xmx16384m -XX:+UseMembar -XX:SurvivorRatio=8 -XX:MaxTenuringThreshold=7 -XX:+PrintGCDateStamps -XX:+PrintGCDetails -XX:+UseConcMarkSweepGC -XX:+UseParNewGC -XX:+CMSClassUnloadingEnabled -XX:-CMSParallelRemarkEnabled -XX:CMSInitiatingOccupancyFraction=80 -XX:SoftRefLRUPolicyMSPerMB=0 -Xloggc:$DORIS_HOME/log/fe.gc.log.$DATE"Modify the case sensitivity parameter
lower_case_table_namesBy default, Doris is case-sensitive for table names. If you require case-insensitive table names, you need to set this during cluster initialization. Note that once the cluster initialization is completed, the table name case sensitivity cannot be changed. Please refer to the variable documentation for more details on thelower_case_table_namessetting.
Start FE process
Start FE process by executing the following command
bin/start_fe.sh --daemon
After FE process is started, it runs in the background. The log files are stored by default in the log/ directory. In the case of startup failure, you can check the error messages in log/fe.log or log/fe.out.
Check FE status
To check the FE startup status, you can connect to the Doris cluster using a MySQL client. The initial user is root with an empty password.
mysql -uroot -P<fe_query_port> -h<fe_ip_address>
After connecting to the Doris cluster, you can use the show frontends command to check the status of the FE nodes. It is important to verify the following:
- If "Alive" is true, the node is alive.
- If "Join" is true, the node has joined the cluster, but it may not be currently active within the cluster (it may be disconnected).
- If "IsMaster" is true, that means the node is the Master node.
Deploy FE cluster (optional)
In a production cluster, it is recommended to deploy at least three Follower nodes. After deploying the FE Master node, you need to deploy two additional FE Follower nodes.
Create the metadata directory
Refer to the deployment of the FE Master node and create the "doris-meta" directory.
Modify FE Follower node configuration
Refer to the deployment of the FE Master node and modify the FE configuration file. In most cases, you can directly copy the configuration file from the FE Master node.
Register the New FE Follower node in the Doris cluster
Before starting the new FE node, you need to register it in the FE cluster.
## Connect to any FE node alive
mysql -uroot -P<fe_query_port> -h<fe_ip_address>

## Register FE Follower node
## fe_edit_log_port can be viewed in fe.conf, set to 9010 by default
## In MySQL Client, execute ALTER SYSTEM statement
ALTER SYSTEM ADD FOLLOWER "<fe_ip_address>:<fe_edit_log_port>"
If you need to add an Observer node, you can use the ADD OBSERVER command.
## Register FE observer node, execute ALTER SYSTEM in MySQL Client.
ALTER SYSTEM ADD OBSERVER "<fe_ip_address>:<fe_edit_log_port>"
- It is recommended to have an odd number of FE Follower nodes (including the Master node), with a suggested number of three to achieve high availability.
- When FE is deployed in a high availability mode (1 Master node, 2 Follower nodes), it is advisable to increase the scalability of the FE read services by adding an Observer FE.
- Typically, one FE node can handle around 10-20 BE nodes. It is recommended to keep the total number of FE nodes below 10.
Start FE Follower node
Execute the following command to start FE Follower node and synchronize metadata automatically.
bin/start_fe.sh --helper <helper_fe_ip>:<fe_edit_log_port> --daemon
helper_fe_ip represents any node alive in the current FE cluster. The --heperparameter is only applied during the initial FE startup to synchronize metadata, and it is not necessary to specify it in subsequent FE restart operations.
Check Follower node status
To check the status of a Follower node, follow the same method of checking the status of the FE Master node. After registering the FE Follower node, use the show frontends command to view the FE node status. Unlike the Master node, the IsMaster status should be false for the Follower node.
Deploy BE
Create directory
BE processes are responsible for data computation and storage. The data directories are by default under be/storage . In a production environment, it is common to use dedicated disks to store data, separating the BE data from the BE deployment files. BE supports distributing data across multiple disks to better utilize the I/O capabilities of the disks.
## Create BE data storage directories on each data disk
mkdir -p <be_storage_root_path>
Modify BE configuration
The configuration file for BE is in the "conf" directory under the BE deployment path. Before starting the BE node, you need to modify the conf/be.conf file.
- Configure Java environment Starting from version 1.2, Doris supports Java UDF (User-Defined Function), and BE relies on the Java environment. You need to configure the
JAVA_HOMEenvironment variable in the operating system beforehand or specify the Java environment variable in the BE configuration file.
## Modify Java environment variable in be/be.conf
JAVA_HOME = <your-java-home-path>
- Configure BE storage path
To modify the BE storage path, you can modify the "storage_root_path" parameter. Separate multiple paths using a semicolon ; (Do not add a semicolon after the last directory.)
Tiered Storage for hot and cold data
Doris supports tiered storage for hot and cold data, where cold data is stored on HDDs or object storage, and hot data is stored on SSDs.
You can differentiate the directories for storing hot and cold data within a node by using HDD (for cold data directory) or SSD (for hot data directory) paths. If you don't require the hot/cold mechanism within the BE node, you only need to configure the paths without specifying the medium type. You also don't need to modify the default storage medium configuration in FE.
When using the tiered storage feature, you need to specify the medium in the storage_root_path parameter.
## In storage_root_path, use medium to specify the disk type
## /home/disk1/doris,medium:HDD: this directory stores cold data;
## /home/disk2/doris,medium:SSD: this directory stores hot data;
storage_root_path=/home/disk1/doris,medium:HDD;/home/disk2/doris,medium:SSD
- When specifying the storage type for the storage path, at least one path should have the storage type set as HDD.
- If the storage type for a storage path is not explicitly declared, it defaults to HDD.
- Specifying the storage type as HDD or SSD is to differentiate the storage types for the paths. It is independent of the physical storage medium. For example, you can designate a directory on an HDD disk as SSD.
- The keywords for storage types, HDD and SSD, must be capitalized.
- Bind cluster IP
In a multi-network interface environment, it is necessary to explicitly configure the "priority_networks". However, in an environment where FQDN is configured, the "priority_networks" can be ignored.
priority_networks = 10.1.3.0/24
Register BE node in Doris
Before starting a new BE node, you need to register the new BE node in the FE cluster.
## Connect to any FE node alive
mysql -uroot -P<fe_query_port> -h<fe_ip_address>

## Register BE node
## be_heartbeat_service_port can be checked from be.conf, set to 9050 by default
## In MySQL Client, execute ALTER SYSTEM statement
ALTER SYSTEM ADD BACKEND "<be_ip_address>:<be_heartbeat_service_port>"
Start BE process
Start BE process by executing the following command:
bin/start_be.sh --daemon
After BE process is started, it runs in the background. The log files are stored by default in the log/ directory. In the case of startup failure, you can check the error messages in log/be.log or log/be.out.
Check BE status
After connecting to the Doris cluster, you can use the show backends command to check the status of the BE nodes.
## Connect to Doris cluster
mysql -uroot -P<fe_query_port> -h<fe_ip_address>

## Check BE status, execute show command in MySQL Client
show backends;
Normally, you should verify the following:
- If "Alive" is true, the node is alive.
- "TabletNum" represents the number of tablets (shards) on that node. When a new node is added, data balancing occurs, and the TabletNum gradually approaches the average.
Validate cluster configuration
Log in to the database
Log in to the Doris cluster using a MySQL Client.
## Connect to Doris cluster
mysql -uroot -P<fe_query_port> -h<fe_ip_address>
Check the version
Check the versions using the show frontends and show backends commands.
## Check the versions of all FE instances in MySQL Client
show frontends \G

## Check the versions of all BE instances in MySQL Client
show backends \G
Modify cluster password
After creating a Doris cluster, the system automatically creates a root user with an empty default password. It is recommended to set a new password for the root user after creating the cluster.
## To confirm that the current user is root, you can check the current user in the MySQL client.
select user();
+------------------------+
| user()                 |
+------------------------+
| 'root'@'192.168.88.30' |
+------------------------+

## To modify the password for the root user, execute the "set password" command in the MySQL client.
SET PASSWORD = PASSWORD('doris_new_passwd');
Create a test table and insert data
In the newly created cluster, you can create a table and insert data into it to verify if the cluster works properly.
## To create a test database, execute the "create database" statement in MySQL Client.
create database testdb;

## To create a test table, execute the "create table" statement in MySQL Client.
CREATE TABLE testdb.table_hash
(
    k1 TINYINT,
    k2 DECIMAL(10, 2) DEFAULT "10.5",
    k3 VARCHAR(10) COMMENT "string column",
    k4 INT NOT NULL DEFAULT "1" COMMENT "int column"
)
COMMENT "my first table"
DISTRIBUTED BY HASH(k1) BUCKETS 32;
Doris is compatible with the MySQL protocol, so you can insert data using the "insert" statement.
## To insert test data, execute the "insert into" statement in MySQL Client.
INSERT INTO testdb.table_hash VALUES
(1, 10.1, 'AAA', 10),
(2, 10.2, 'BBB', 20),
(3, 10.3, 'CCC', 30),
(4, 10.4, 'DDD', 40),
(5, 10.5, 'EEE', 50);

## To verify the data, execute the "select" statement in MySQL Client.
SELECT * from testdb.table_hash;
+------+-------+------+------+
| k1   | k2    | k3   | k4   |
+------+-------+------+------+
|    3 | 10.30 | CCC  |   30 |
|    4 | 10.40 | DDD  |   40 |
|    5 | 10.50 | EEE  |   50 |
|    1 | 10.10 | AAA  |   10 |
|    2 | 10.20 | BBB  |   20 |
+------+-------+------+------+
5. FAQ
What is priority_networks?
Doris processes listen to network segments represented in CIDR format for IP addresses. If the deployed machines only have one network segment, no configuration is needed. However, if there are two or more network segments, it is essential to configure them.
This parameter is mainly used to help the system select the correct network card IP as its listening IP. For example, if the required listening IP is 192.168.0.1, you can set priority_networks=192.168.0.0/24. The system will automatically scan all IPs on the machine, and only those matching the 192.168.0.0/24 network segment will be used as service listening addresses. You can also configure multiple CIDR network segments in this parameter, such as priority_networks = 10.10.0.0/16; 192.168.0.0/24.
Why use priority_networks to configure listening address segments instead of directly setting the listening IP address in the configuration file?
The main reason is that Doris is a distributed cluster, and the same configuration file will be deployed on multiple nodes. To facilitate deployment, updates, and maintenance, it is desirable to keep all nodes' configuration files consistent. By configuring the listening address segment and then starting the system, the appropriate listening IP can be found based on this network segment, thus each machine can use a single value in this configuration.
Why do new BE nodes need to be manually added to the cluster?
After the BE node is started, you need to send a command to the FE through the MySQL protocol or the built-in web console to join the BE node to the cluster.
How does the FE know which BE nodes constitute the cluster?
As a distributed database, Doris generally has many BE nodes. Doris adds BE nodes to the cluster by sending commands to the FE. This is different from the way how BE nodes know the addresses of FE nodes and then actively report connections. The way of manual adding and having the FE actively connect to BE nodes is beneficial to cluster management in many aspects. For example, it can determine which nodes constitute the cluster and it can proactively shut down a BE node that cannot be connected to.
How to quickly detect whether the FE has started successfully?
You can use the following command to check if the FE has started successfully.
# Retry the following command, if it returns "msg":"success",the FE has started successfully.
server1:apache-doris/fe doris$ curl http://127.0.0.1:8030/api/bootstrap
{"msg":"success","code":0,"data":{"replayedJournalId":0,"queryPort":0,"rpcPort":0,"version":""},"count":0}
Does Doris provide built-in Web UI?
Doris FE has a built-in Web UI. Users do not need to install a MySQL client to perform tasks such as adding BE/FE nodes or running other SQL queries.
To access the Web UI, simply enter the URL in a web browser: http://fe_ip:fe_port, for example, http://172.20.63.118:8030. This will open the built-in Web console of Doris.
The built-in Web console is primarily intended for use by the root account of the cluster. By default, the root account password is empty after installation.
For example, you can execute the following command in the Playground to add a BE node.
ALTER SYSTEM ADD BACKEND "be_host_ip:heartbeat_service_port";
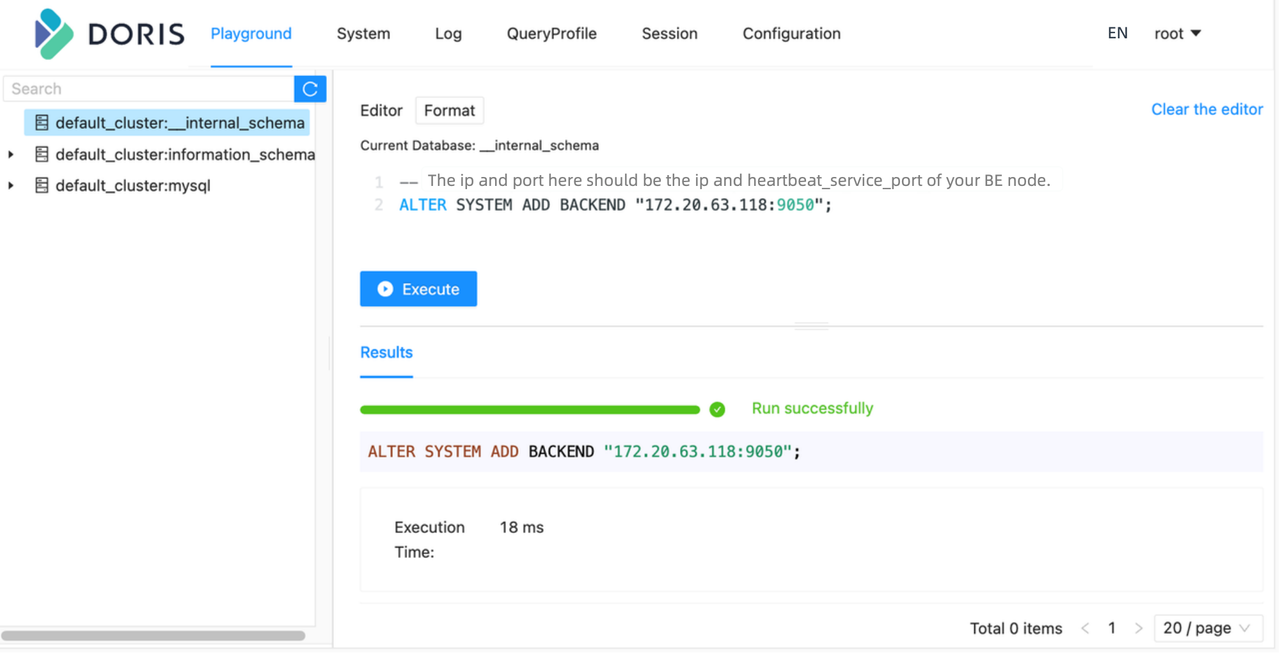
For successful execution of statements that are not related to specific databases/tables in the Playground, it is necessary to randomly select a database from the left-hand database panel. This limitation will be removed later.
Why can't I change the root password via the Web UI?
The current built-in web console cannot execute SET type SQL statements. Therefore, in the web console, you cannot change the root password using statements like SET PASSWORD FOR 'root' = PASSWORD('your_password'). You can use MySQL Client to change the password for the root account.